Choosing the right injection molding materials is a key step that directly shapes product quality, performance, and cost-efficiency. With countless thermoplastics and resins available—each with distinct mechanical, thermal, and aesthetic properties—material selection can be challenging, even for experienced engineers. This guide explores the most important factors to consider when selecting materials for injection molding, helping you make informed, confident decisions that align with your design goals, compliance requirements, and production constraints.

What to Consider When Choosing an Injection Molding Material
Selecting a plastic resin is never a one-size-fits-all decision. Each application introduces different mechanical stresses, environmental exposures, regulatory standards, and design priorities. Below are the key factors that should shape your material selection process, not just from a datasheet perspective, but from a product success standpoint.
Mechanical and Structural Requirements
Consider what forces your part will endure during its lifetime: tensile stress, compression, impact, wear, or repeated motion. Will it need to withstand sudden impacts or hold its shape under constant load? Materials like nylon (for strength and toughness) or polycarbonate (for impact resistance) may be ideal depending on the use case. Overengineering for strength, however, may unnecessarily increase cost or weight—choose with precision, not assumption.
Thermal Performance
Does your part operate near heat sources or in freezing environments? Thermal resistance isn’t just about the melting point—it includes dimensional stability under heat, thermal cycling endurance, and heat deflection temperature. For example, PEEK excels in high-temperature environments, while polypropylene suits low-heat consumer applications. Ignoring thermal behavior is one of the most common failure points in material selection.
Environmental and Chemical Exposure
If your product is exposed to moisture, oils, fuels, or cleaning agents, chemical resistance becomes a priority. Nylon, for instance, has great strength but tends to absorb water, problematic for dimensional accuracy. Conversely, acetal (POM) maintains stiffness and low friction even in humid conditions. Always ask: What substances will the material contact, and for how long?
Visual and Aesthetic Goals
Injection molding isn’t just functional—it’s also about appearance. Will your part need high surface gloss? Transparency? Smooth matte finish? Some plastics, like ABS, polish well and accept coatings or paint. Others, like polycarbonate, offer clarity but require higher mold precision. Visual consistency across production runs also depends on material stability and colorability.
Regulatory and Safety Compliance
Different industries come with different standards. Medical devices may require USP Class VI or ISO 10993 compliant materials; food-contact products demand FDA-grade resins. Not all plastics are suitable for regulated environments, and post-processing (such as additives or coloring) can affect compliance. Early collaboration with your molder and materials supplier ensures conformance without late-stage surprises.
Cost and Processability
Material cost goes beyond the price per kilogram. It includes moldability, cycle times, scrap rates, and the complexity of tooling. High-performance plastics might reduce part count or enhance durability, but also require higher injection pressure or longer cooling times. Evaluate not just material performance, but how efficiently it can be processed within your manufacturing setup.
Bonus Perspective: Think in Trade-offs, Not Absolutes
One of the most overlooked truths in material selection is that there’s no perfect plastic—only the best fit for your goals and constraints. Engineers often focus on a single property—say, strength—at the expense of cost, flowability, or appearance. Balancing priorities is where experience meets insight.
Quick Comparison – Common Injection Molded Plastics
Comparing plastic molding materials can be challenging, as each resin has distinct performance traits and trade-offs. To simplify your decision, we’ve outlined a comparative snapshot of six widely used materials, balancing key performance metrics, applications, and trade-offs.
Note: These are general benchmarks. Always validate against specific grade datasheets and your application context.
Material Comparison Table
| Material | Ideal Strength Profile | Design Flexibility | Surface & Color Behavior | Processing Risk Level | Best-Fit Applications |
|---|---|---|---|---|---|
| ABS | Moderate impact + good stiffness | High – good for complex and thin-walled parts | Easy to paint and finish; accepts plating | Low risk; widely used, good flow | Consumer electronics, aesthetic enclosures |
| Nylon (PA) | High tensile + wear resistance | Medium – sharp corners can cause stress | Poor paintability; sensitive to moisture-induced swelling | Medium – requires strict drying | Gears, load-bearing mechanical parts |
| PC | Very high impact + dimensional stability | Low–thick parts may stress crack | Optical clarity is excellent, but needs mold polishing | Highly sensitive to shear & stress | Medical housings, light covers, safety components |
| PP | Medium strength + high fatigue resistance | High – suitable for living hinges, thin walls | Natural waxy finish, not good for paint | Low – excellent flowability | Disposable medical items, packaging, and fluid systems |
| TPE | Soft and elastic under repeated use | High – conforms well to overmolded shapes | Often self-colored, soft-touch surface | Medium – sensitive to cooling rate & flow | Grips, soft-touch handles, vibration dampers |
| POM (Acetal) | High stiffness + low friction | Medium – limited flexibility in tight designs | Glossy surface, poor adhesion to coatings | Highly prone to flashing, gate sensitivity | Precision gears, moving mechanical sub-assemblies |
While charts help you compare at a glance, don’t rely solely on technical data. Performance in real-world molding depends on the specific grade, mold design, part geometry, and even the production environment. That’s why many teams prototype multiple materials before scaling up.
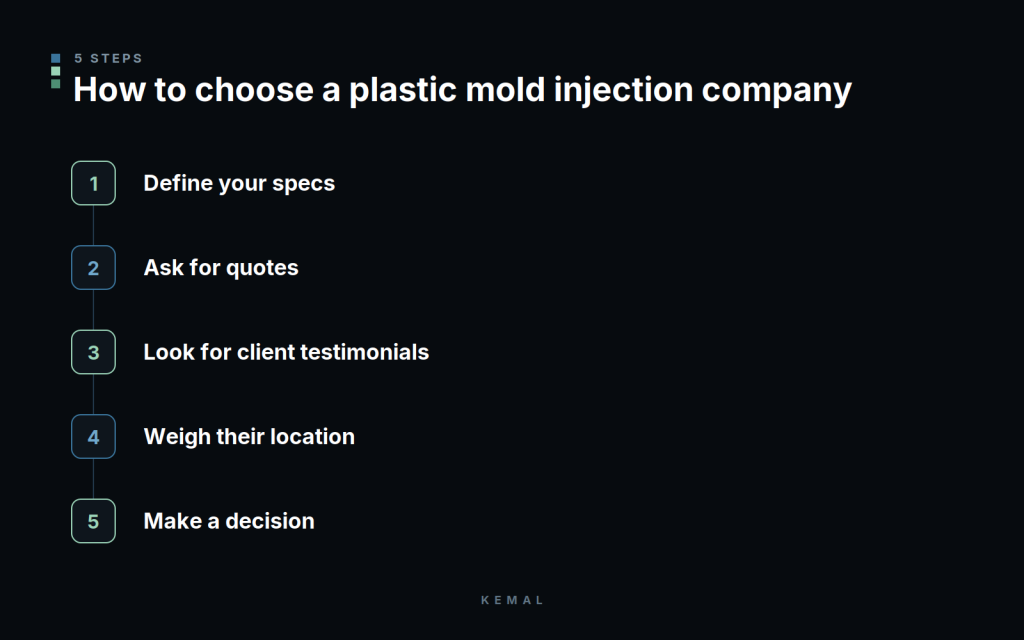
A Step-by-Step Plastic Material Selection Guide
Many teams start with datasheets, but the best material decisions start with context. Here’s a structured framework to help you narrow down your resin options, validate assumptions, and align your material with project goals.

Step 1: Define Your Product’s Function and Environment
Start with the big picture: What does the part need to do, and where will it be used?
Ask questions like:
- Will it be load-bearing?
- Exposed to UV, chemicals, or extreme temperatures?
- Is it a visible or touch-sensitive surface?
Outcome: A clear list of functional and environmental demands.
Step 2: Prioritize Key Performance Requirements
Convert your needs into material properties. Do you require:
- High tensile strength or impact resistance?
- Dimensional stability over time?
- Flexibility or fatigue resistance?
- Cosmetic features like gloss, color, or transparency?
Tip: Over-specifying leads to over-spending. Focus on must-haves, not nice-to-haves.
Step 3: Shortlist Candidate Materials
Use your criteria to identify 2–4 candidate materials. Resources include:
- Material comparison charts (like the one in Section 3)
- Manufacturer websites and tech datasheets
- Molder or supplier recommendations based on tooling capabilities
Avoid defaulting to a familiar material—better options may exist for your new use case.
Step 4: Evaluate Regulatory and Cost Constraints
Now test your candidates against constraints:
- Are they FDA- or medical-grade certified?
- Do they require specialty tooling or mold finishes?
- What’s the raw material cost per unit, and the processing cost?
Watch out for hidden costs, like longer cooling cycles or higher reject rates.
Step 5: Prototype and Test Early
No datasheet replaces real-world performance. Prototype early, especially if:
- You’re testing a new resin
- Tolerances are tight
- Aesthetic or tactile feel matters
Even simple molding trials can reveal issues with shrinkage, warpage, or surface finish before mass production begins.
Step 6: Finalize and Optimize for Production
Once the resin is chosen, work with your mold designer and molder to:
- Adjust gate design, wall thickness, or draft angles based on flow behavior
- Validate the material’s impact on tooling wear, cycle time, and overall yield
- Lock in long-term availability and sourcing consistency
Good material decisions aren’t made in isolation—they’re integrated into your overall design-for-manufacturing (DFM) process.
Common Mistakes to Avoid When Selecting Injection Molding Materials
Even experienced engineers fall into traps when selecting resins, especially under time pressure or cost constraints. Understanding these pitfalls can help you avoid delays, defects, and expensive redesigns.
Mistake 1: Prioritizing Cost Over Performance
It’s tempting to choose the cheapest resin on the list, especially for high-volume parts. But low-cost materials can lead to higher reject rates, shorter part lifespan, and costly recalls down the line.
What to do instead: Optimize for total cost of ownership, not just raw material pricing. Include processing ease, yield, and durability in the equation.
Mistake 2: Overengineering the Material Choice
Specifying a high-performance resin “just to be safe” often backfires. It increases tooling demands, extends cycle times, and inflates material costs—without adding real product value.
What to do instead: Match resin capabilities precisely to what your part actually needs—not more, not less.
Mistake 3: Ignoring Moisture Sensitivity or Post-Molding Behavior
Some plastics, like Nylon or ABS, absorb moisture or degrade over time if improperly stored. Others may warp, shrink, or stress crack if ejected too early or processed incorrectly.
What to do instead: Understand material-specific handling and drying requirements. Involve your molder early to account for post-molding behavior.
Mistake 4: Overlooking Regulatory and Compliance Requirements
Using the wrong resin for food contact, medical use, or flammability standards can delay market entry or trigger legal risks.
What to do instead: Validate compliance needs (FDA, UL, REACH, RoHS) before prototyping, not after tooling investment.
Mistake 5: Relying Only on the Datasheet
Technical datasheets provide useful benchmarks, but they rarely reflect real-world molding conditions. Flow rates, shrinkage, and surface quality can vary significantly across grades or tool geometries.
What to do instead: Prototype early and test under realistic conditions. And never hesitate to ask your materials supplier or molder for grade-specific insights.

When to Involve Experts or Use Simulation Tools
Not every project requires deep simulation or external consultation, but for high-precision or high-risk applications, guessing isn’t a strategy.
When Should You Talk to a Material Expert?
If you face any of the following, don’t go it alone:
- You’re unfamiliar with how a material behaves in a complex mold
- Your part will be exposed to aggressive chemicals or extreme conditions
- You’re unsure whether a material meets regulatory standards (FDA, ISO, UL)
- Aesthetics or tactile feel are critical and must remain consistent
- You’re using multi-cavity molds or high-volume tools where shrinkage is risky
What experts bring: Material specialists and mold engineers can help identify better-performing, lower-cost alternatives—or flag compatibility issues you didn’t know existed.
What Can Moldflow and Simulation Tools Tell You?
Modern software allows you to simulate resin behavior under real tooling and molding conditions before cutting steel. Simulation can reveal:
- Flow imbalances and potential short shots
- Areas of excessive stress or weld lines
- Predicted shrinkage and warpage zones
- Cooling time optimization for cycle time reduction
- Pressure and clamping force requirements
Why it matters: These insights prevent design flaws, reduce tool rework, and help you fine-tune gate location, wall thickness, and even material grade.
How to Get the Most Out of Expert Support
Whether working with a supplier, a contract manufacturer, or a DfM consultant:
- Bring them in early. The earlier in the design stage, the more they can influence cost-saving or risk-reducing decisions.
- Share full context. Including CAD files, part function, expected volume, and target market helps them guide material selection better.
- Stay iterative. Use their input to prototype smarter, test faster, and validate confidently.
Bringing in the right people or tools at the right time doesn’t slow you down—it sets you up for smoother production, fewer surprises, and better-performing products from day one.
Conclusion
Choosing the right injection molding material isn’t just about selecting from a list of plastics—it’s about aligning engineering requirements, regulatory needs, and manufacturing realities into a material strategy that works. A thoughtful approach to resin selection reduces cost, improves quality, and helps ensure your product performs exactly as intended.
Where to start or want to confirm your material selection before production? Get in touch with us—we’re here to support you every step of the way.