Most teams face the same dilemma early in a project: you need molded parts quickly to validate the design, but you don’t want to invest in production-grade tooling for something that may still change. At the same time, relying on prototype tooling can feel risky—if the data doesn’t translate to mass production, the cost of rework later can be even higher.
What Is Prototype Tooling (Prototype / Rapid Tooling)?
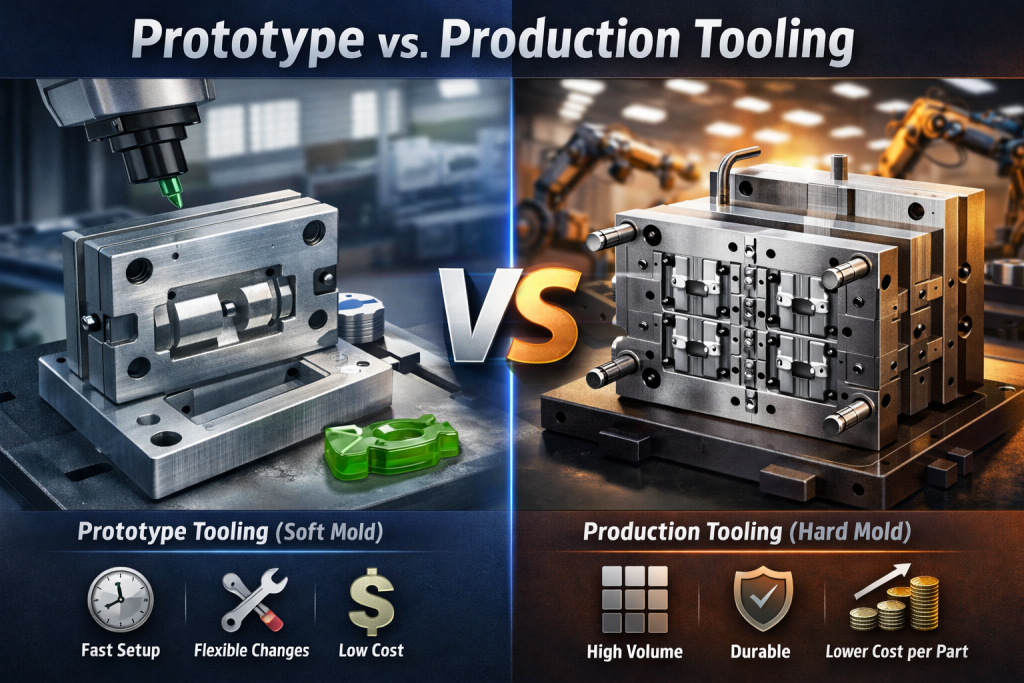
Prototype tooling is designed for one primary purpose: to get molded parts quickly so you can validate the design before committing to production-level investment. It is not intended to run indefinitely or to optimize unit cost. Instead, it helps teams answer early questions about manufacturability, fit, and function while the design is still evolving.
From a tooling standpoint, prototype molds are typically made from aluminum or lower-hardness tool steels such as P20. These materials allow faster machining and simpler manufacturing workflows, which translates directly into shorter lead times. More importantly, they make design changes easier to implement when the first round of parts reveals issues that need correction.

Advantages of Prototype Tooling
- Short lead times: Faster mold build and quicker access to molded parts for decision-making.
- Lower upfront investment: Reduced financial risk while the design is not yet frozen.
- Efficient iteration: Design changes such as gate adjustments, steel-safe modifications, or local geometry tweaks can usually be made with less disruption.
Where prototype tooling reaches its limits
Prototype tooling is not a substitute for production tooling, and pushing it beyond its intended role introduces risk:
- Limited tool life: Not suitable for sustained, high-volume production.
- Material constraints: High injection pressures or abrasive materials (for example, glass-filled resins) accelerate wear and reduce consistency.
- Lower stability ceiling: Tight cosmetic standards, narrow process windows, or long-term dimensional repeatability are harder to maintain.
When prototype tooling makes the most sense
Prototype tooling delivers the most value when the goal is validation rather than optimization:
- DFM validation to confirm filling, ejection, warpage, and overall moldability.
- Functional and assembly testing of snaps, seals, fits, and interfaces.
- Market trials or pilot runs using real injection-molded parts.
- Typical volume range: 100–2,000 parts, depending on material, geometry, and quality requirements.
In short, prototype tooling helps you reduce design risk quickly. Once the focus shifts to process stability, repeatability, and long-term unit cost, a production or bridge tooling strategy becomes the more appropriate next step.
What Is Production Tooling (Production / Hard Tooling)?

Production tooling—often called hard tooling—is built for one job: repeatable output at scale. Unlike prototype tooling, which prioritizes speed and iteration, production tooling is engineered to hold stable dimensions, run predictable cycles, and maintain performance over long production runs.
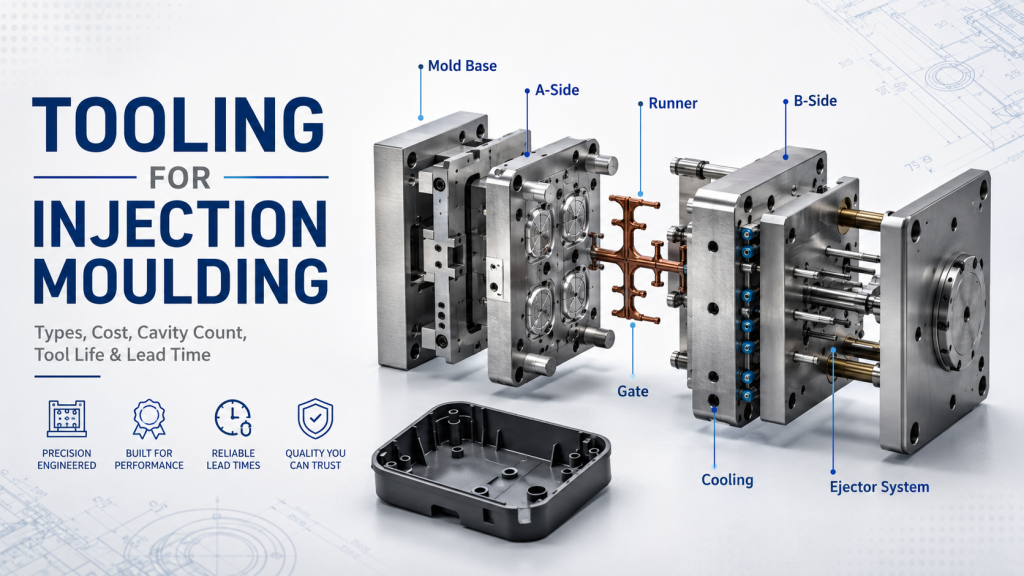
In practice, production molds are typically made from hardened tool steels such as NAK80, S136, or H13, and they are frequently designed as multi-cavity tools to maximize throughput. The intent is not just “stronger steel,” but a tooling system that can survive high cycle counts while keeping the process window stable and the part-to-part variation tight.
Advantages of Production Tooling
- Low part price at volume: Once demand is stable, multi-cavity output and cycle efficiency drive down cost per part.
- High durability and long tool life: Hardened steels resist wear, deformation, and surface damage over extended runs.
- Better repeatability and consistency: More robust mold design (cooling, venting, ejection, and shut-offs) supports tighter dimensional control and less drift over time.
Where production tooling becomes a commitment
Production tooling is a strategic investment, and the trade-offs are real:
- Higher CAPEX: You are paying upfront for longevity, stability, and throughput.
- Harder to modify: After heat treatment and final fit, significant design changes can become slow, expensive, or constrained by steel conditions.
- Longer build time: A realistic timeline is often 4–8+ weeks, especially when the tool is complex (multi-cavity, tight cosmetic requirements, advanced cooling, or validation deliverables).
When production tooling makes the most sense
Production tooling is the right choice when the program has moved from “learning” to “execution,” such as:
- High-volume production, commonly 10,000+ parts, where unit economics matter more than iteration speed.
- Tight tolerances / CTQ-driven features, where the process must hold stable dimensions over long runs.
- Demand for long-term consistency, including cosmetic standards, controlled shrink/warpage behavior, and predictable assembly outcomes.
- Programs with formal quality requirements, where repeatability and documentation/validation often become part of the deliverable.
In short, production tooling is the correct tool when your priority is no longer “Can we make this?” but “Can we make it the same way, every time, at scale—and at the right cost per part?”
Deep Comparison: Soft Tooling vs. Hard Tooling
When teams say “soft tooling vs. hard tooling,” they are usually trying to balance two competing priorities: how fast you can learn versus how stable and cost-efficient you can manufacture at scale. The table below summarizes the practical differences that most directly impact project outcomes.
| Dimension | Soft Tooling (Prototype / Rapid Tooling) | Hard Tooling (Production Tooling) |
| Material | Aluminum or lower-hardness steels (e.g., P20) | Hardened steels (e.g., NAK80, S136, H13), often multi-cavity |
| Tool Life | Shorter life; intended for validation and limited runs | Long life; designed for high cycle counts and long-term stability |
| Upfront Cost | Lower initial investment; optimized for speed and iteration | Higher CAPEX; investment in durability, throughput, and consistency |
| Unit Price | Higher per-part cost at scale due to fewer cavities, less cycle optimization | Lowest unit price at volume due to multi-cavity output and cycle efficiency |
| Flexibility | High flexibility; changes (gate/steel-safe tweaks) are typically faster and cheaper | Lower flexibility; post-hardening changes are slower, costlier, and sometimes limited |
ROI Calculation: When Should You Switch?
The real ROI question is not “Which mold is cheaper?” but “At what point does continuing with soft tooling stop making economic sense?” That point is the break-even volume, where the higher upfront cost of hard tooling is offset by its lower unit price.
Consider a simplified comparison. With soft tooling, you might invest $5,000 in the mold and pay $2.00 per part. Hard tooling, by contrast, may require $20,000 upfront, but the unit price drops to $0.50 once production is running. At low volumes, the soft tool is clearly cheaper—the upfront cost dominates the equation. As volume increases, however, the unit price difference starts to matter more than the mold cost itself.
When you calculate total cost across volume, the curves cross at roughly 10,000 parts. Below that point, soft tooling remains the lower-risk, lower-cost option. Around 10,000 parts, the total spend is effectively the same. Beyond that volume, hard tooling quickly becomes the more economical choice, and the savings increase with every additional unit produced.
What this calculation does not show is just as important. The true switch point is rarely driven by math alone. Late design changes, unstable demand, scrap rates, or tight quality requirements can all push the break-even point higher. In practice, hard tooling delivers real ROI only when two conditions are met at the same time: demand is credible, and the design is stable enough that you are no longer paying for change.
How to Make the Final Decision (Expert Guidance)
Don’t start with “soft vs. hard.” Start with what risk you still have. The right tooling choice is the one that reduces the largest uncertainty in your project.
Is your market forecast reliable?
If demand is still a guess, hard tooling locks you into a volume assumption. In that phase, soft or bridge tooling keeps downside limited. If demand is real and repeatable, staying on soft tooling usually means you keep paying a higher unit cost unnecessarily.
Is the design truly frozen?
“Mostly stable” is not stable. If CTQs, mating interfaces, or key geometry may still change, hard tooling makes every revision slower and more expensive. Prototype/bridge tooling is often the safer step until the design stops moving.
How much cash-flow pressure do you have?
Even when hard tooling wins on paper, the upfront CAPEX can restrict parallel work (testing, inventory, secondary ops). A staged approach may be better if capital constraints are the real bottleneck.
Does the material force your hand (e.g., glass-filled resins)?
Abrasive materials wear soft tools quickly and expose weak shut-offs, gates, and parting lines. If the material is non-negotiable and consistency matters, hardened steel may be required earlier than the break-even volume suggests.
A practical takeaway: go hard when demand is credible, the design has stopped changing, your cash flow can absorb CAPEX, and the material/process conditions require durability and repeatability.
Conclusion
Choosing between prototype and production tooling is not just a pricing exercise. Optimizing only for unit price can drain cash too early, while avoiding upfront investment for too long often means paying a hidden tax on every part produced. The real objective is to align your tooling strategy with where your project stands today—not where you hope it will be.